What is Backstage ?
Backstage began life as an internal project at Spotify and was released as an open-source project in 2020. Its original intention was to be a central location where the company had a registry of all software they had in production but has since evolved into a much more advanced platform, including a plugins system that helps users extend the platform. This plugin system is a significant reason for Backstages success and drove adoption within the company. This open and extensible architecture has proved extremely powerful in providing engineering teams with the tools to have visibility across all aspects of the software development lifecycle. Backstage is released under the Apache 2.0 license and is now a CNCF Sandbox project.
Why use Backstage ?
In the cloud-native world, our applications and our infrastructure have become increasingly intertwined – everything is a software development process, and we can’t really separate our workloads from the containers that they are deployed in.
Combined with modern pipeline driven delivery systems, this has meant that from a development perspective, the scope of what information that we’re interested in as developers have increased dramatically, as has the range of systems we are using in our development pipelines. We really want to be able to get information in a unified way across the whole pipeline from development to production and to have an efficient way of providing that information to our developers to enable them to be as productive as possible as quickly as possible.
Being able to tie all of these things together into single panes of glass with a single source of truth for configuration is where Backstage comes in – an open API to allow building catalogues and dashboards of all the systems our teams are using, along with a service catalog which gives developers access to documentation, configuration and templates associated with a particular software project.
Security and Backstage
Backstage’s plugin architecture has enabled a wide range of different integrations, with everything from CI systems to monitoring and alerting, and integrating security into Backstage is a logical step. Developers have increasing responsibility for security in the cloud world, often including containers and configuration as well as application code, and surfacing security information as early and often as possible during development is critical.
Integrating with the Snyk API
Snyk’s full-featured API is designed to allow integration into many other systems, and the Snyk Backstage plugin leverages the Snyk API to enable Snyk data to be visualised directly in Backstage, along with all the other data points which our development teams might be interested in around their applications. Being able to surface security information directly into the development workflow, along with prioritisation and remediation advice, is one of the key tenets of Snyk’s Developer-first approach to security, and enabling integration with a wide range of systems is the underlying principle behind the Snyk API.
Let’s take a look at installing Backstage and the Snyk plugin!
Prerequisites
These instructions assume you are installing on macOS. For other platforms, please check the official Backstage documentation.
- Node Version Manager (nvm) so that you can ensure you’re using Node version 14.
Run: curl -o- <https://raw.githubusercontent.com/nvm-sh/nvm/v0.37.2/install.sh> | bashor
curl -o- <https://raw.githubusercontent.com/nvm-sh/nvm/v0.37.2/install.sh> | zsh on MacOS Catalina and newer.- Node version 14.x (Node.js version 15 isn’t yet supported)
Run nvm use --lts so that you can run Node version 14.15.5 for this demo.- Yarn
brew install yarnUsing npx you can run the following to create an app in the subdirectory of your choice from your current directory :
npx @backstage/create-appYou will be asked some questions on setup. The recommendation for this tutorial is to go with SQLite.
➜  backstage npx @backstage/create-app
npx: installed 67 in 11.243s
? Enter a name for the app [required] elastic
? Select database for the backend [required]
  PostgreSQL
❯ SQLite
If successful, you will see this message:
 Moving to final location:
  moving    	elastic ✔

 Building the app:
  executing 	yarn install ✔
  executing 	yarn tsc ✔

🥇 Successfully created backstage
Change directory into where Backstage was installed and run the following command:
yarn workspace backend startA successful output will look like:
2021-03-05T10:16:04.957Z backstage info Initializing http server
2021-03-05T10:16:04.961Z backstage info Listening on :7000
2021-03-05T10:16:08.677Z catalog info Read 27 entities from location bootstrap:bootstrap in 3.8s type=plugin component=catalog-all-locations-refresh
2021-03-05T10:16:08.733Z catalog info Wrote 27 entities from location bootstrap:bootstrap in 56ms type=plugin component=catalog-all-locations-refresh
2021-03-05T10:16:08.734Z catalog info Locations Refresh: Completed locations refresh in 3.8s type=plugin component=catalog-all-locations-refresh
Open a new terminal window and run:
yarn start
yarn run v1.22.10
$ yarn workspace app start
$ backstage-cli app:serve
Loaded config from app-config.yaml
fatal: not a git repository (or any of the parent directories): .git
WARNING: Failed to read git commit, ExitCodeError: Command 'git rev-parse HEAD' exited with code 128
fatal: not a git repository (or any of the parent directories): .git
WARNING: Failed to describe git version, ExitCodeError: Command 'git describe --always' exited with code 128
ℹ 「wds」: Project is running at https://localhost:3000/
ℹ 「wds」: webpack output is served from /
ℹ 「wds」: Content not from webpack is served from /Users/user/backstage/elastic/packages/app/public
ℹ 「wds」: 404s will fallback to /index.html
ℹ 「wdm」: wait until bundle finished: /
ℹ 「wdm」: Compiled successfully.
If successful, a browser window will open up, and you will be presented with the following:
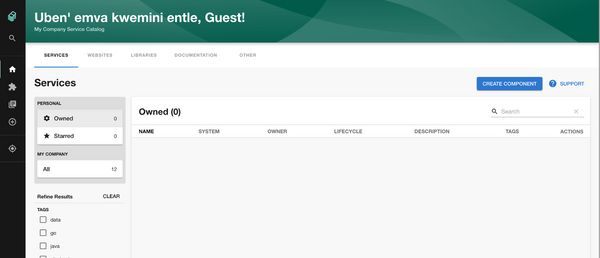
You have successfully installed Backstage on your machine!
Install the Snyk plugin
Once you have backstage installed, you can install the Snyk plugin.
To get an API token, you need to sign up for a Snyk account. Within this account, you will need to obtain three things.
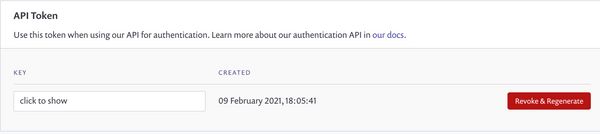
API token
This can be found by clicking your name in the top right-hand corner and going to General Settings.
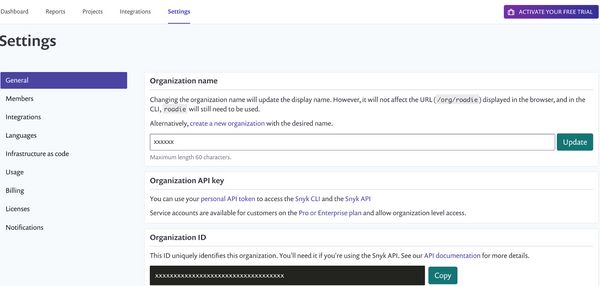
Organization Name
This can be found under the settings page that is visible when you login to Snyk
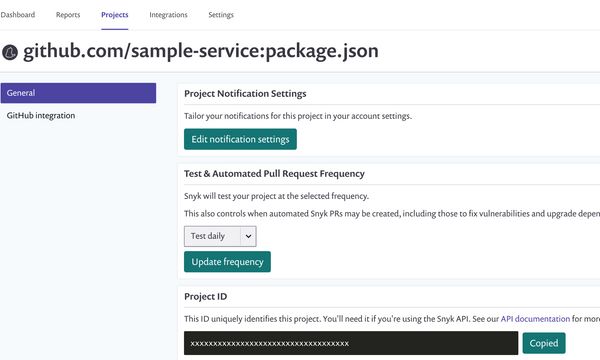
Project ID
This can be found under the Projects tab.
Open a terminal window at the root of your backstage installation. Change directory to packages/app and run the following command:
yarn add backstage-plugin-snykThe output should look something like this:
yarn add v1.22.10
[1/4] 🔍  Resolving packages...
[2/4] 🚚  Fetching packages...
[3/4] 🔗  Linking dependencies…
…
…
[4/4] 🔨  Building fresh packages...

✨  Done in 10.45s.
Modify the packages/app/src/plugins.ts to include this line to make the plugin available:
export { plugin as SnykPlugin } from 'backstage-plugin-snyk';Add the Snyk tab by modifying packages/app/src/components/catalog/EntityPage.tsx:
Import the plugin:
import { Router as SnykRouter, SnykOverviewComponent } from 'backstage-plugin-snyk';Now add the layout. For this step please note that the … is not a spread operator but a means to draw attention to the fact there is code surrounding the
const ServiceEntityPage = ({ entity }: { entity: Entity }) => (
  <EntityPageLayout>
   ...
    <EntityPageLayout.Content
      path="/snyk"
      title="Snyk"
      element={<SnykRouter entity={entity} />}
    />
   ...
  </EntityPageLayout>
);
You can change the title if you wish for something else like “Security”.
Next, add this proxy config to the app-config.yaml file at the root directory of your backstage instance:
proxy:
  ...

  '/snyk':
    target: https://snyk.io/api/v1
    headers:
      User-Agent: tech-services/backstage-plugin/1.0
      Authorization:
        $env: SNYK_TOKEN
  ...
Take the token you obtained from Snyk’s site and run the following in the terminal window.
Restart the backend so the token is applied.
export SNYK_TOKEN="xxxxxxxxxxxxxxxxxxxxxxx"Replace the string of x’s with your token.
To expose the plugin to a particular service, go to the git repository you wish to register. Locate the catalog-info.yaml file and add the Snyk organization name and project id to the annotations section of the file from earlier in this post. This effectively creates the integration between Snyk scanning and that project’s repository.
annotations:
    github.com/project-slug: roadiehq/sample-service
    # The Sentry organization is stored in the app-config.yaml of the Backstage instance.
    sentry.io/project-slug: sample-service
    pagerduty.com/integration-key: xxxxxxxxxxxxxxxxxxxxxxxxxxxxxxx
    snyk.io/org-name: roadie
    snyk.io/project-ids: xxxxxxxxxxxxxxxxxxxxxxxxxxxxxxx
With this config in place, the repository can now be registered as a component in Backstage.
Click on the create component button in the top right corner.

Once there, you can click on the register existing component.

Paste in the link to the catalog-info file located in your Github repository. Click on analyze.
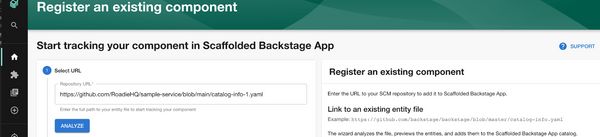
Click on import

Once imported, you can navigate to the service.
Snyk will appear in a tab.

By clicking on the tab, you can view the contents of the plugin.
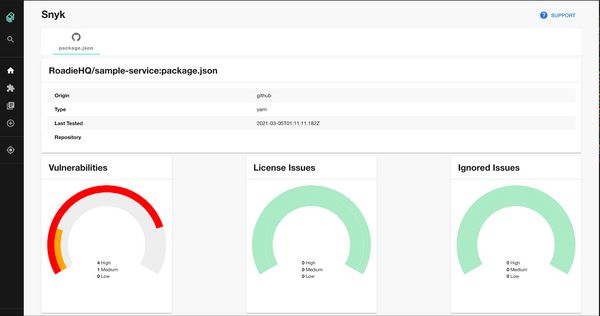
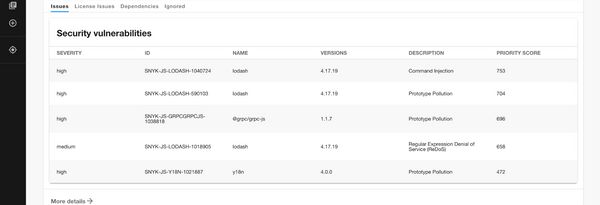
And there you have it, Snyk vulnerability data displayed directly in Backstage. This allows you to view real-time security information about your project, empowering developers with visibility and remediation advice on how to fix security related issues.
In Cloud Native application development, our developers have increasing responsibility for security, in many cases across both applications, containers and configuration, so integrating security scanning throughout the software development life cycle becomes a key principle of Cloud Native application security. Integrations like the Snyk Backstage plugin make it easier for developers to access and action security information directly in their workflows.